This guide is something we started as a project over a decade ago and never formally published because of the complexity of the process involved.
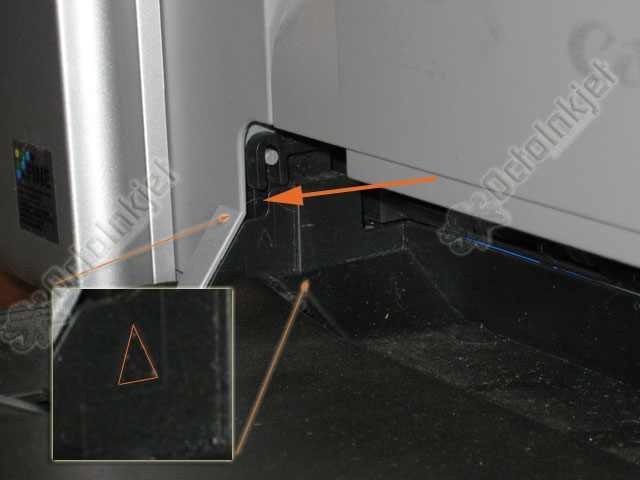
However it’s becoming apparent that more Canon Pixma owners are interested in DIY solutions so we’ve made this guide available in a picture only format that illustrates the the process for installing a Printer Potty waste ink kit to the Canon Pixma iP4200 and would probably be applicable to newer models like the iP4500, etc… where only the case release tabs are likely to be significantly different.
Notes and annotation will be added as time allows but this is definitely not an instruction set for anyone who is not technically competent and/or confident.
Use entirely at your own risk!
- 01_LF-release
- 01_LF-release

- 02_RF-release
- 02_RF-release

- 03_back-release
- 03_back-release

- 04_RS-release
- 04_RS-release

- 05-release-RF
- 05-release-RF

- 06-lift-RF
- 06-lift-RF

- 07-lift-RF-release-RS
- 07-lift-RF-release-RS

- 08-lift-RS
- 08-lift-RS

- 09-release-RB-lift
- 09-release-RB-lift

- 10-remove-USB
- 10-remove-USB

- 11-release-LB-lift
- 11-release-LB-lift

- 12-release-LS-lift
- 12-release-LS-lift

- 13-release-LF
- 13-release-LF

- 14-lift-off1
- 14-lift-off1

- 15-lift-off2
- 15-lift-off2

- 16-psu-unplug
- 16-psu-unplug

- 17-psu-tab-release
- 17-psu-tab-release

- 18-psu-remove
- 18-psu-remove

- 19-screws-RS
- 19-screws-RS

- 20-screws-LS
- 20-screws-LS

- 21-drill-thread-tube
- 21-drill-thread-tube

- 22-cut-padding
- 22-cut-padding

- 23-replace-padding
- 23-replace-padding

- 29-tube-release-1
- 29-tube-release-1

- 30-tube-connect
- 30-tube-connect

- 31-tube-connect2
- 31-tube-connect2

- 32-tubes-connected
- 32-tubes-connected

- 33-start-replace-chassis
- 33-start-replace-chassis

- 34-cdtray-slide-LS
- 34-cdtray-slide-LS

- 35-cdtray-slide-RS
- 35-cdtray-slide-RS

- 36-cdtray-slide-in-RS
- 36-cdtray-slide-in-RS

- 37-cdtray-slide-in-done-RS
- 37-cdtray-slide-in-done-RS

- 38-cdtray-slide-in-done-LS
- 38-cdtray-slide-in-done-LS

- 39-tube-pull-chassis-down
- 39-tube-pull-chassis-down

- 40-replace-screws
- 40-replace-screws

- 41-replace-psu
- 41-replace-psu

- 42-replace-psu-cable
- 42-replace-psu-cable

- 43-replace-RF-panel
- 43-replace-RF-panel

- 44-replace-case-1
- 44-replace-case-1

- 45-organise-wires
- 45-organise-wires

- 46-replace-USB
- 46-replace-USB

- 47-click-case-final
- 47-click-case-final

- 48-RS-FP
- 48-RS-FP

- 49-LS-FP
- 49-LS-FP

- 50-exit-tubes
- 50-exit-tubes

- 51-finished
- 51-finished

